Linux无人值守安装服务器搭建
环境:
Centos7.6+TFTP+FTP+DHCP+Kickstart
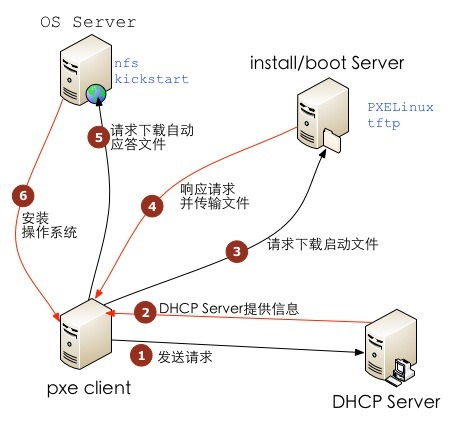
运行原理如下图:

1、配置基本环境
[root@qunniao ~]# systemctl disable --now firewalld.service
Removed symlink /etc/systemd/system/multi-user.target.wants/firewalld.service.
Removed symlink /etc/systemd/system/dbus-org.fedoraproject.FirewallD1.service.
[root@qunniao ~]# sed -i '/SELINUX/s/enforcing/disabled/' /etc/selinux/config
[root@qunniao ~]# getenforce 0
2、安装DHCP
[root@qunniao ~]# yum install dhcp -y
cat >/etc/dhcp/dhcpd.conf<<EOF
subnet 192.168.11.0 netmask 255.255.255.0 {
range 192.168.11.100 192.168.11.200;
option routers 192.168.11.1;
next-server 192.168.11.10;
filename "pxelinux.0";
}
EOF
[root@qunniao ~]# systemctl enable --now dhcpd.service
[root@qunniao ~]# netstat -anpl | grep -w 67
udp 0 0 0.0.0.0:67 0.0.0.0:* 12562/dhcpd
注:dhcp安装后先不要启动,配置的ip地址段必须要在当前机器网卡存在,否则会报错
3、安装配置TFTP
[root@qunniao ~]# yum install tftp tftp-server xinetd -y
[root@qunniao ~]# sed -i '/disable/s/yes/no/' /etc/xinetd.d/tftp
[root@qunniao ~]# systemctl enable --now xinetd.service
[root@qunniao ~]# netstat -anpl | grep -w 69
udp 0 0 0.0.0.0:69 0.0.0.0:* 12892/xinetd
4、安装FTP
[root@qunniao nginx]# yum install vsftpd
[root@qunniao ~]# systemctl enable --now vsftpd.service
[root@qunniao ~]# netstat -anpl | grep -w 21
tcp6 0 0 :::21 :::* LISTEN 13029/vsftpd
5、配置数据文件
[root@qunniao ~]# mount /dev/sr0 /mnt
[root@qunniao ~]# cp /mnt/images/pxeboot/{initrd.img,vmlinuz} /var/lib/tftpboot/
[root@qunniao ~]# mkdir /var/lib/tftpboot/pxelinux.cfg
[root@qunniao ~]# cp /mnt/isolinux/isolinux.cfg /var/lib/tftpboot/pxelinux.cfg/default
[root@qunniao ~]# chmod 644 /var/lib/tftpboot/pxelinux.cfg/default
[root@qunniao ~]# yum install syslinux -y
[root@qunniao ~]# cp /usr/share/syslinux/pxelinux.0 /var/lib/tftpboot/
[root@qunniao ~]# cp -a /mnt/* /var/ftp/pub/
[root@qunniao ~]# sed -i '/default/s/vesamenu.c32/linux/' /var/lib/tftpboot/pxelinux.cfg/default
append initrd=initrd.img inst.repo=ftp://192.168.11.10/pub inst.ks=ftp://192.168.11.10/ks.cfg
[root@qunniao ~]# sed -i '64c append initrd=initrd.img inst.repo=ftp://192.168.11.10/pub inst.ks=ftp://192.168.11.10/ks.cfg' /var/lib/tftpboot/pxelinux.cfg/default
注:
第1行:default linux表示指定默认入口名称;
第61到64行表示定义的引导入口,自动安装必须能访问kickstart文件。
有多种方法可访问kickstart文件,其中最常用的一种方法是通过网络服务器进行,例如:ftp服务器、WEB服务器或NFS服务器
kickstart文件的常见书写格式:
ks=ftp://server/dir/file 如:ks=ftp://192.168.11.10/ks.cfg
ks=http://server/dir/file 如:ks=http://192.168.11.10/ks.cfg
ks=nfs:server:/dir/file 如:ks=nfs:192.168.11.10:/var/ftp/pub/ks.cfg
6、配置yum源
cat>/etc/yum.repos.d/centos7.repo<<EOF
[development]             #名字必须为development,否则在kickstart生成ks.cfg文件时会找不到软件
name=my-centos7-dvd
baseurl=file:///var/ftp/pub
enabled=1
gpgcheck=0
EOF
[root@qunniao ~]# yum clean all
[root@qunniao ~]# yum makecache
6、安装kickstart生成ks.cfg文件
- 6.1、安装kickstart、gdm
[root@qunniao ~]# yum -y install system-config-kickstart gdm
- 6.2、使用xstart生成ks.cfg文件
第一步:填写相应的ssh参数并在执行命令中输入:system-config-kickstart

第二步:设置下默认安装的语言,时区,根口令,然后勾选下面的安装后重新引导。

注:对于“安装后重启”这一项,分情况选择:
情况1:如果服务器本身有数据,建议不勾选。因为系统在重启的过程中,如果第一引导顺序还是网卡,那么会再次重新安装系统,可能会造成事故。
情况2:如果被安装的服务器本身没有系统,或产全新服务器,建议勾选,因为安装系统时默认是磁盘作为第一引导,而磁盘中没有系统,就直接跳过了磁盘引导,使用网卡引导,当系统安装好后,再重启时,自动使用磁盘做引导,进入新安装的系统。
第三步:选择执行全新安装,配置ftp服务器和目录

第四步:配置引导选项

第五步:根据实际需求分区

第六步:网络配置(默认没有网络设置,点击添加网络,设备名称为ens33,网络类型为dhcp)

第七步:验证(默认即可)

第八步:防火墙、SELinux配置(根据需求选择是否开启)

第九步:安装图形环境(根据需求选择,生产环境一般不安装)

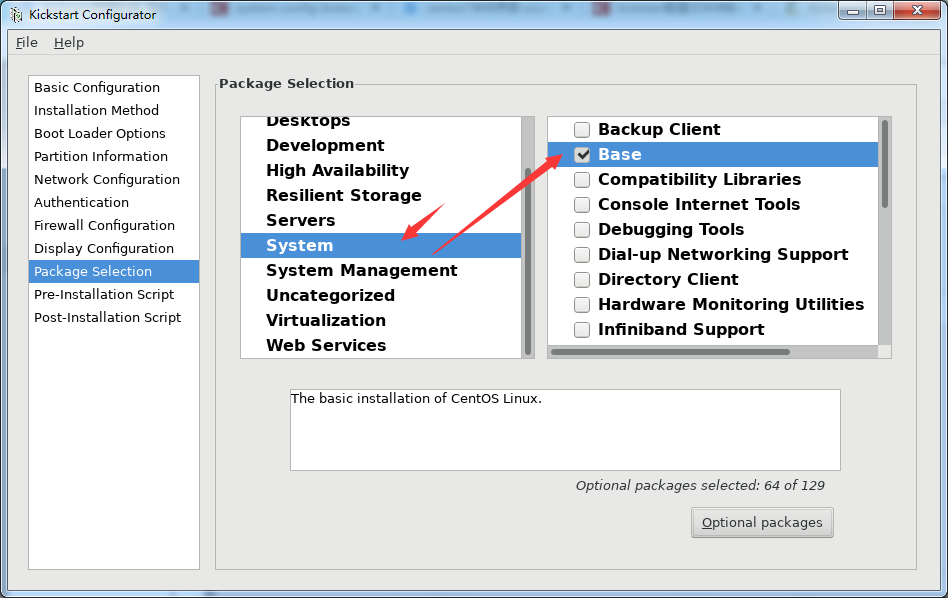
第十步:自定义安装软件包

第十一步:安装脚本(脚本预安装脚本和安装后脚本,如果没有可以不写)


第十二步:保存生成ks.cfg文件


注:如果生成的ks.cfg文件没有在ftp目录中,还需要移动到ftp目录下,且需要与tftp中default文件设置的ks=ftp://192.168.11.10/ks.cfg相应对应
7、测试
- 7.1、修改客户机BIOS启动顺序为网卡启动

- 7.2、按F10保存,启动系统,开始无人值守安装


注:如果在部署过程中遇到相应错误,请参考无人值守常见问题及解决方法解决https://www.qunniao.net/1209.html
温馨提示:如无特殊说明,本站文章均为作者原创,转载请注明出处!


