Haproxy+keepalived+mysql 集群配置
环境:Centos7 mariadb5.5
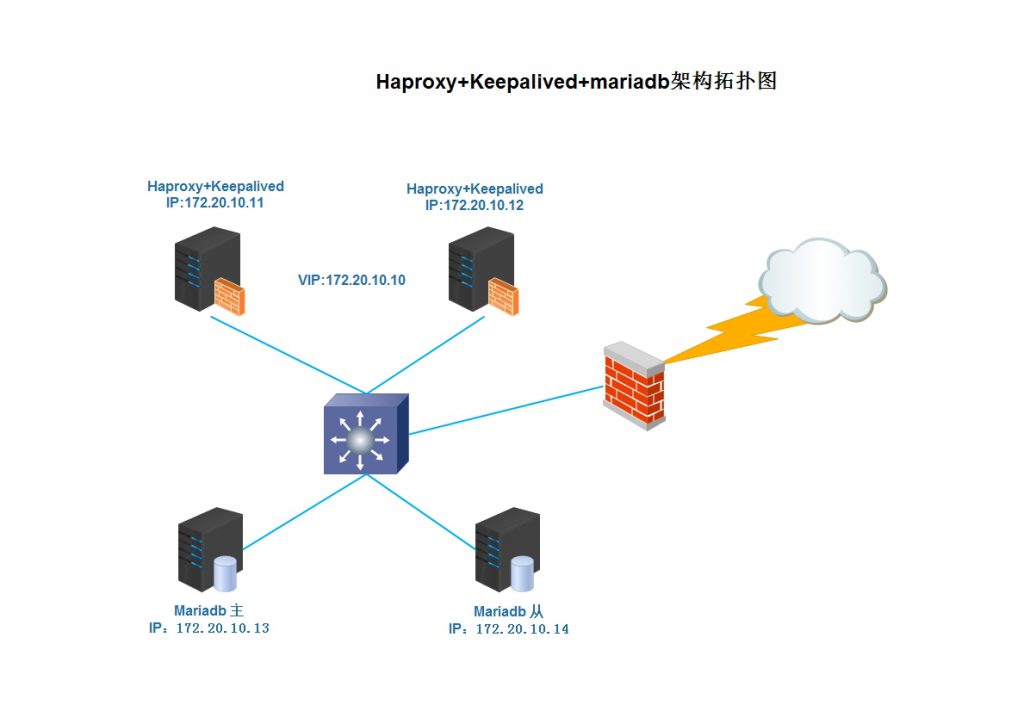
一、配置mysql主从
- 安装mariadb (172.20.10.13/14)
# yum -y install mariadb-server
- mysql主配置
1、修改配置文件
# vim /etc/my.cnf
      [mysqld]
      server-id=1
      log-bin=master-bin
      innodb-file-per-table=ON
      skip-name-resolve=ON
2、启动mysql服务
    # systemctl start mariadb
    # systemctl enable mariadb.service
3、授权
 MariaDB [(none)]> grant replication slave on *.* to 'admin'@'172.20.10.%' identified by "123456";
 MariaDB [(none)]> flush privileges;
4、查看主库状态
 MariaDB [(none)]> show master status;
+-------------------+----------+--------------+------------------+
| File | Position | Binlog_Do_DB | Binlog_Ignore_DB |
+-------------------+----------+--------------+------------------+
| master-bin.000002 | 245 | | |
+-------------------+----------+--------------+------------------+
- mysql从配置
1、修改配置文件
# vim /etc/my.cnf
    [mysqld]
    server-id = 2
    relay-log-index=relay-log.index
    innodb-file-per-table=ON
    skip-name-resolve=ON
2、启动mysql服务
    # systemctl start mariadb
    # systemctl enable mariadb.service
3、授权
    MariaDB [(none)]> change master to master_host='172.20.10.13',master_user='admin',master_password='123456',master_log_file='master-bin.000001',master_log_pos=245;
    MariaDB [(none)]> start slave;
    MariaDB [(none)]> show slave status\G
    Relay_Master_Log_File: master-bin.000002
    Slave_IO_Running: Yes
    Slave_SQL_Running: Yes
二、Haproxy配置
1、安装(172.20.10.11/12)
# yum -y install haproxy
2、修改配置
# vim /etc/haproxy/haproxy.cfg
 defaults
 mode tcp
 log global
 option httplog
 option dontlognull
 option http-server-close
 option forwardfor except 127.0.0.0/8
 option redispatch
 retries 3
 timeout http-request 10s
 timeout queue 1m
 timeout connect 10s
 timeout client 1m
 timeout server 1m
 timeout http-keep-alive 10s
 timeout check 10s
 maxconn 3000
 frontend main *:3333
 default_backend mysql
 backend mysql
 balance roundrobin
 server mysql1 172.20.10.13:3306 check
 server mysql2 172.20.10.14:3306 check
3、启动服务
 # systemctl start haproxy
 # systemctl enable haproxy.service
4、查看服务
# netstat -antup |grep 3333
tcp  0  0   0.0.0.0:3333   0.0.0.0:*       LISTEN           23778/haproxy
三、配置Keepalived
1、安装
# yum -y install keepalived
2、修改配置
- MASTER配置
# vim /etc/keepalived/keepalived.conf
! Configuration File for keepalived

global_defs {
 notification_email {
 acassen@firewall.loc
 }
 notification_email_from Alexandre.Cassen@firewall.loc
 smtp_server 192.168.200.1
 smtp_connect_timeout 30
 router_id ha_mysql
 vrrp_skip_check_adv_addr
# vrrp_strict     #vrrp严格规则,不适用单波,开启会无法和vip通信
 vrrp_garp_interval 0
 vrrp_gna_interval 0
}
vrrp_script chk_haproxy {
 script "/etc/keepalived/check_ha.sh"
 interval 2
}
vrrp_instance mysql {
 state MASTER
 interface ens192
 virtual_router_id 51
 priority 100
 advert_int 1
 authentication {
 auth_type PASS
 auth_pass 1111
 }

virtual_ipaddress {
 172.20.10.10
 }
 track_script {
 chk_haproxy
 }
}
- BACKUP配置
# vim /etc/keepalived/keepalived.conf
! Configuration File for keepalived

 global_defs {
 notification_email {
 acassen@firewall.loc
 }
 notification_email_from Alexandre.Cassen@firewall.loc
 smtp_server 192.168.200.1
 smtp_connect_timeout 30
 router_id ha_mysql
 vrrp_skip_check_adv_addr
# vrrp_strict     #vrrp严格规则,不适用单波,开启会无法和vip通信
 vrrp_garp_interval 0
 vrrp_gna_interval 0
 }
 vrrp_script chk_haproxy {
 script "/etc/keepalived/check_ha.sh"
 interval 2
}
 vrrp_instance mysql {
 state BACKUP
 interface ens192
 virtual_router_id 51
 priority 90
 advert_int 1
 authentication {
 auth_type PASS
 auth_pass 1111
 }
 virtual_ipaddress {
 172.20.10.10
 }
 track_script {
 chk_haproxy
 }
 }
3、检测脚本
# vim /etc/keepalived/check_ha.sh
#/bin/sh
stat=$(ps -C haproxy --no-header | wc -l)
if [ $stat -eq 0 ];then
 systemctl stop keepalived
fi
4、启动服务
# systemctl start keepalived
# systemctl enable keepalived
5、查看vip是否生效
# ip addr
inet 172.20.10.10/24 scope global secondary ens192
四、验证
# systemctl status -l keepalived (master)
● keepalived.service - LVS and VRRP High Availability Monitor
  Loaded: loaded (/usr/lib/systemd/system/keepalived.service; enabled; vendor preset: disabled)
  Active: active (running) since 五 2018-04-27 15:23:35 CST; 1h 29min ago
  Apr 27 15:31:22 qunniao2 Keepalived_vrrp[11456]: VRRP_Instance(mysql) Entering MASTER STATE
# systemctl status -l keepalived  (backup)
● keepalived.service - LVS and VRRP High Availability Monitor
 Loaded: loaded (/usr/lib/systemd/system/keepalived.service; disabled; vendor preset: disabled)
 Active: active (running) since Fri 2018-04-27 15:31:22 CST; 1h 28min ago
 Apr 27 15:31:22 qunniao2 Keepalived_vrrp[11456]: VRRP_Instance(mysql) Entering BACKUP STATE
五、测试高可用
- 测试是用VIP连接数据库,连接则成功!
# mysql -u admin -p123456 -h 172.20.10.10 -P3333
- 关闭master Haproxy,服务正常,并把VIP漂移到BACKUP上,则完成
# systemctl stop haproxy.service
# ip addr
inet 172.20.10.10/24 scope global secondary ens192
温馨提示:如无特殊说明,本站文章均为作者原创,转载请注明出处!